script async src="//pagead2.googlesyndication.com/pagead/js/adsbygoogle.js"> google.com, pub-0949974396517105, DIRECT, f08c47fec0942fa0

Football Party Food: Build a Snackadium with #SNICKERSMinis

“The reason women don’t play football is because eleven of them would never wear the same outfit in public.” –  Phyllis Diller… My home is a football home. I have some serious football lovers living here. Me? I have very little understanding of it all, but I like the food, I love having people over, and enjoy all of the excitement around it all. So in a way, I guess I love football too. I remember years ago, when Mike and I were first dating – His favorite team of all time, the Seahawks, made it to the Superbowl. Since we live just a couple of hours from Seattle, there was a LOT of excitement all over town for that game – it was a huge deal. Billboards all over town, stores were selling out of Seahawks gear, it was craziness. That was the first game I ever really watched – Mike explained how the game worked to me as it was played, and I finally “got” it. Alas, the Seahawks didn’t win {yes, I am a firm believer that those stinky ol’ Steelers stole the game. Sorry Steelers fans!} – but it did give me a much better appreciation for the game. These days, Mike manages his super-serious fantasy football team, we watch the games every week, and we love to have football parties. So that means I needed to come up with some creative new football party foods this year, since football season is in full swing now…

Snickers minis chocolate bagged candy

How to Build a Snackadium for Football Party Fun with #SNICKERSMinis

You might remember the Snackadium that I made last year, using chips and dips. I made that a couple of times for different parties, and it was a HUGE hit. So, I thought it might be fun to try to create a new Snackadium this year made out of sweets instead. My challenge was to find the new NFL bagged Snickers Minis at Walmart, and incorporate them into my dessert display. And I love a challenge! Here’s a list of what you’ll need to do this too:

  • Snickers bagged candy, the minis and the fun size bars.
  • Wilton white and milk chocolate candy melts, one bag each – and you’ll have lots left over for other projects too.
  • A bag of rod pretzels
  • Disposable aluminum baking pan {I forgot this, and had to use an old cookie sheet, which doesn’t look as clean and nice}
  • Fruit dip {or make your own, mix half marshmallow fluff with half cream cheese. So good!}
  • Caramel dip
  • Food coloring
  • Stadium fillers – I used 2 packages of filled sandwich cookies,1 big bag of apple slices, and the rest of the Snickers candy
  • One giant Rice Krispies Treat, cut into squares
  • Toothpicks

And, before you head out to Walmart to pick up all of these goodies, make sure to print out some of the new football party coupons – so you can get extra savings. {See my own Walmart search for NFL Snickers bagged candy on Google+.}  Because us busy mommas on a budget need all the help we can get, right? Once you’ve gathered all of your supplies, you’re ready to get started on your Snackadium.

how to build a snackadium

How to Build a Snackadium

Ok, building a Snackadium takes a a bit of time, but it’s really pretty darn easy to do. First step is to gather all your supplies and Snickers candy. Now, let me walk you step by step through the basics:

  • Playing Field: I used a fruit dip tinted green with Wilton gel color to make the field, and caramel dip on each end to make the end zones. To help keep the edges even, I put down two little wooden BBQ skewers where I want the divide to be – as you can see in the second photo above. Then just take them out when you’re done, and smooth any little shmears.
  • Goal Posts: These look complicated, but are pretty much impossible to mess up, I promise. Take two Snickers fun size bars, and dig a little notch in one side of each one like the photo, so they fit snug around the pretzel rod. That’s your base. Break one pretzel rod in half, and another into smaller sections, to make the top of your goal posts. To put it all together, melt some milk chocolate candy melts – dip each piece in candy, stick ’em together, and arrange on wax paper to cool {once they harden, they’ll stick together sturdy.} My trick: I used a thin book {yep, that’s the Baby Brezza cookbook that Abby and I are in!} – Then I laid the pretzel goal post on it, with the bottom Snickers bars on the stovetop beneath, so the whole thing could lay flat. Worked great!
  • Stadium Walls: Cut your giant Rice Crispy Treat into rectangles – then stick them together with toothpicks, to make a retaining wall around your stadium.

Congrats – The hard part is behind you! You’ve made your football field, set up a wall around the perimeter {love using that word. Perimeter…} and you’re goal posts are cooling down. Let’s fill the stands, and set up the field. Ready? Go….

snickers snackadium

“Thanksgiving dinners take eighteen hours to prepare. They are consumed in twelve minutes. Half-times take twelve minutes. This is not coincidence.” –  Erma Bombeck

Filling the Snackadium is simple – just take whatever goodies you’ve got, and fill them inside of your Rice Crispy Treat “stadium” walls. This makes your crowd of fans – ready and eager to see the #SNICKERSMinis players enter the marshmallow dip playing field…. To make the players, you’ll just melt a couple of handful of white candy melts in a couple of different bowls, and add a different color of food coloring to each one. Dip the tops of the Snickers minis in the candy, let cool – and now you’ve got two opposing teams. Grab your cooled candy and pretzel goal posts – put one in each end zone, with the caramel dip keeping them in place. Then place your chocolate football players on the field, however you wanna set ’em up. Now it’s time to cheer – and let the games begin!

Snickers Snackadium

“If winning isn’t everything, why do they keep score?” –  Vince Lombardi

Here it is – the Snickers Snackadium! Fun, right? When I make this to bring to parties, I’ll definitely be using the disposable aluminum pans, for a cleaner look. This was just kind of a test-drive, to see how this would all come together. I love it – and I’m sure it’ll be as popular as the chips and dips Snackadium of last year – if not more popular, because I mean, who doesn’t LOVE Snickers, right? Perfect football party snack. Love it!
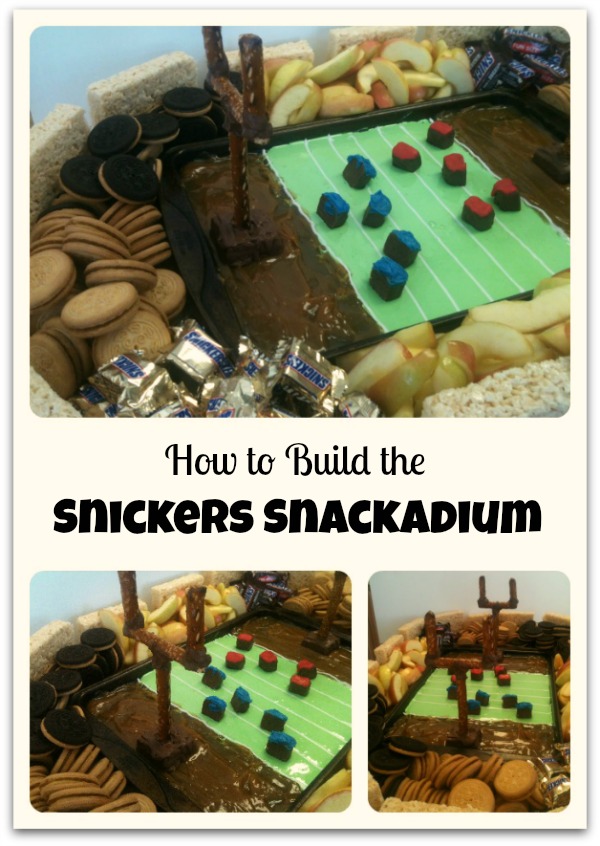
How to build the Snickers Snackadium

Hope you have fun building your own Snackadium too!

You can find tons more ideas on building Snackadium creations online, there’s an actual site – Snackadium.com, totally devoted to it. There are some crazy-impressive ideas on there that make me feel like SUCH an underachiever, lol. And if enjoyed this little tutorial, I’d love for you to share it with a retweet or a pin!

If you decide to make your own Snackadium this fall, either the chips style, Snickers style, or something totally new – I would love, love, LOVE it if you’d come share pics on my Facebook wall! I might even feature them on my site – I love seeing the amazing creativity my readers have. You guys rock.

Snickers NFL bagged minis

Like Snickers on Facebook, and follow them on Twitter @Snickers too!

{Disclaimer: I am a member of the Collective Bias™ Social Fabric® Community.  This shop has been compensated as part of a social shopper insights study for Collective Bias™ and SNICKERS® Brand #CBias #SocialFabric. All photos and Snackadium creativity here are 100% my own work.}


signature

Guide to Grilliance: 5 Tips to Choosing & Grilling the Best Beef

Beef – It’s what’s for dinner… Ok, we’ve all heard this phrase before, right? And for many of us, it usually really is what’s for dinner. Whether your budget is more hamburger helper, or sirloin steak – beef is a staple in most families meal planning. But, there are a ton of misconceptions out there about cooking with beef. We get stuck in a rut of preparing and serving it in the same old ways week after week. We know we love it, but wonder if we should cut back, thinking it’s not the healthiest choice. Well, good thing for you {and me!} – I was recently part of a super cool campaign where I learned a ton about choosing, buying, storing, and preparing beef for our families. I can’t believe how much there was to learn – so I’m excited to share some cool new tips, tricks, info, and recipes with you lovely ladies too.

5 tips to choosing the best beef

Tips on choosing and buying the best beef

When shopping the meat section of your local grocery store, it can be kind of overwhelming trying to choose the best buys. There are so many different cuts, grades, and types! So here are a few tips to help you:

  1. Choose packages that are cold, tightly and completely wrapped with no tears or punctures.
  2. Be sure the packages do not contain excessive liquid – this can be an indication of problems with temperature or storage.
  3. Prime has the most marbeling – it’s usually sold to high-end restaurants, but is sometimes available at supermarkets. Choice cuts have a little less marbling, and are the most widely available. Select has the least amount of marbling, making it leaner and slightly less juicy and flavorful as the other two grades.
  4. Choose steaks and roasts that are firm to the touch, not soft.
  5. Choose packages of beef with a bright cherry-red color. Beef that’s been sealed in vacuum packed bags turns a more purplish-red color.

I didn’t know most of this – so I found it all super helpful. I do all of the grocery shopping in our house. And I was a vegetarian for years before I met Mike, so I’m not that skilled at choosing or cooking meat – and he is like the King of Meat & Potatoes, lol. I’m always so unsure of what to choose – but I feel way more confident choosing great stuff now. He’s going to be a happy man when I start coming home with amazing steaks more often…

 Make Steakhouse Steaks at Home

Ok, so now you know how to pick the best beef for dinner while shopping at the grocery. What do you do with it when you get home? Most of us either put it in the fridge to cook later that night, or toss it in the freezer for later. That’s fine, but why not learn a few tips on storing your beef – so that it’s ready to rock when you’re ready to follow the tips in the video above, and make your steakhouse style dinner….

  • Pick up beef last, right before check out. And, to keep it from leaking on other groceries, grab a couple of those plastic produce bags to wrap them in before adding to your cart. Super helpful.
  • You can freeze beef in it’s orgininal packaging for up to two weeks. If you need it frozen longer, figure out what meals you’ll be making, divide it into right-size portions and wrap in heavy-duty aluminum foil or freezer bags labeled with the date.
  • Ground beef is more perishable than roasts or steaks – it needs to be used or frozen within a day or two of purchase.

Following these tips will make sure you don’t waste money on wasted meat, and make sure that whatever you serve is super safe. And – now that you know how to shop for beef, and how to store it properly when you get it home – you’re ready for grillin’ time!

beef for dinner

Cooking with Beef

We looooove grillin’. I’m sure that if you’ve read my blog much over the summer, you’ve realized that about me, lol. And – what’s better for grilling than beef, right? You can get some great beef cooking tips on the Beef – It’s what’s for dinner website, and learn about other great ways to prepare it too, like pan or stir-frying, broiling or braising, and stewing and roasting. {Did you even realize there were so many ways to cook it? Awesome.} But for us, most of our beef is cooked on the grill. Since I had just learned all of this new info about beef, we invited some friends over for Labor Day Weekend, to celebrate the end of summer and show off my new skills. Check it out…

grilling with beef - party time

Labor Day Weekend BBQ with Beef on the Grill

The easiest way to get your dinner rockin’ is to make a marinade or rub – and they’re honestly really simple to do. You can make them from scratch, or buy some pre-made rubs or mixes at the supermarket. We tried out this new Dry BBQ Rub this weekend, and it rocked. For reals.

Dry BBQ Rub

Ingredients

  • 2 tbsp chili powder
  • 2 tbsp packed brown sugar
  • 1 tbsp ground cumin
  • 2 tsp minced garlic
  • 2 tsp cider vinegar
  • 1 tsp Worcestershire sauce
  • 1/4 tsp ground red pepper

Instructions

  1. Easy peasy - Just mix all of the ingredients together, and coat evenly on all sides. Rubs can be applied right before cooking - or up to two hours before grillin'. Cook 'em up, and eat 'em up.
https://sunshineandsippycups.com/2012/09/5-tips-to-choosing-the-best-beef/

Love it, or what?

I hope you’ve learned some new tips along with me here. I’ll be sharing a few of the other great recipes I’ve tried out lately with you guys over the rest of the month – along with more simple tips, that are perfect for busy moms like us. And, for a few more helpful tips – check out this great infographic with 3 Simple Steps for Grilling Beef. Very cool. And, share your fave beef grilling tips or recipes with me in the comments! I love hearing your smart tips.

{Disclosure: I wrote this review while participating in a In Home Party campaign by Mom Central Consulting on behalf of The National Cattlemen’s Beef Association and received product samples to facilitate my party and review, and a promotional item to thank me for participating.}

signature

3 Simple Steps for Grilling Beef – Infographic

Beef, it’s what’s for dinner at my house – how about yours? If you’re ready to learn some great new tips on choosing, buying, storing and preparing beef, get the best tips on what to look for at the supermarket and how to put the best beef on your table. And get more tips to up your “Grilliance” in this awesomely helpful infographic:

Beef Grilling 3-16-12


signature

Creative Ideas for Cooking with Bagel Crisps

“Vegetables are a must on a diet. I suggest carrot cake, zucchini bread, and pumpkin pie.” – Jim Davis… Some of you might remember that I lost quite a bit of weight on the Nutrisystem diet earlier this year. {20 pounds total – super exciting.} Once I went back to preparing my own meals again, I still tried to follow the structure for healthy eating that I learned during my Nutrisystem time, and have learned so much about eating healthier. I recently found a great new figure-friendly snack that I’m totally lovin’ – New York Style Bagel Crisps. And while I totally love ’em as just a pop in your mouth and eat on their own kinda snack, I thought they could also be a really great addition to some of my fave recipes too. Keep reading to learn more about why I’m super addicted to the crisps, and some creative ways to cook with them too…

new york style bagel crisps

New York Style Bagel Crisps Rock my Socks

These new crisps come in 4 varieties – I tried out the BBQ and the Sea Salt. I loved ’em so much on their own that I went out and bought more – one of each type – so that I could experiment a bit with them in the kitchen. Why do I love ’em? Well, let me count the ways…

  • 50% Less Fat than Potato Chips: You can eat 16 of these bagel crisps for less than 5 grams of fat, and only 130 calories. Yes, there are some snacks that are even better for you, but when you’re in the mood for something salty, crunchy, and BBQ’y {is that a word?} – these are an amazingly better option for you than regular chips.
  • Perfectly Crunchy: I hate bagel crisps that are too hard. I want crunch – but not chip-a-tooth crunchy, you know? But these have a perfect crunch – similar to a chip, just a bit more substantial. And unlike a chip, they are sturdy enough for dips and toppings.
  • Whole Wheat: I love, love, LOVE that the first ingredient in these crisps is Wheat Flour. And yes, there are a few artificial ingredients in these babys {they don’t claim to be all natural or anything} – but the list is pretty darn short. And again,  amazingly better than most potato chips.

So now that you’re starting to fall in love with these crisps too, I’ll share some great recipes and ideas for using them in recipes, appetizers, and healthy snacks for you and the kids.

creative casserole ideas

Creative Ideas for Cooking with Bagel Crisps

Since these New York Style Bagel Crisps have such a great crunch, I figured they’d be a great ingredient in some of my favorite casseroles. And I was right. {Am I ever wrong? Wait – don’t answer that…} My favorite was adding the Cheddar crisps into my cheesy breakfast casserole – added a great crunch by replacing my usual english muffins with these, and made it less fat. Love it. Get the recipe here:

Cheesy Crunchy Breakfast Casserole

Ingredients

  • 2 packages (12 ounces each) breakfast sausage links - cooked
  • Half a bag of Cheddar Flavor New York Style Bagel Crisps
  • 1/4 cup of melted butter
  • 2 cups of shredded cheese - You can mix two kinds, or use a Mexican Cheese Blend
  • 1/2 cup peppers {You choice}
  • 12 eggs
  • 2 cups milk
  • Couple shakes of salt and pepper
  • 1/4 Cup bacon bits or chopped ham

Instructions

  1. Grease a 13 x 9-inch baking pan. Layer half of the sausage, half of the bagel crisps, then repeat again. Pour melted butter over the layers, then top with cheese and peppers. {Save just a bit of cheese to top it off later.}
  2. Grab a big bowl - mix up the eggs, milk, salt, and pepper. Pour the mixture over the casserole layers. Top with the bacon or ham, and the last bit of cheese. Cover it up with foil and refrigerate overnight.
  3. Take casserole out of the fridge 30 minutes before you want to bake it. Uncover and bake at 350°F for 45 to 50 minutes. You'll know it's done when a knife or toothpick poked in the middle comes out clean.
  4. Let stand 5 minutes. Then slice it up, serve it up, and watch it disappear with a quickness.
https://sunshineandsippycups.com/2012/08/creative-ideas-for-cooking-with-bagel-crisps/

Sounds super yummy, right? If you love cheesy casserole recipes, you’ll also love this one – Mexican Casserole, but replace the tortilla chips with the Cheddar Bagel Crisps too. Sooooo good! And of course – you can always enjoy these crisps on their own. Since they’re awesome for dipping – grab a few of the great dip recipes from their website to mix up for your next get together. I especially liked the Buffalo Chicken Dip. And, after trying that one and loooovin’ it, I was inspired to make it into a salad too. Get it here:

Buffalo Chicken Salad

Ingredients

  • 1 pound chicken tenders
  • 4 tbsps of your favorite hot sauce
  • 1/2 cup crumbled blue cheese
  • 3 tbsp light mayo
  • 3 tbsp sour cream
  • 3 tbsp milk
  • Lettuce blends of your choice
  • 1 cup shredded carrots
  • New York Style Bagel Crisps - Sea Salt, broken into big chunks

Instructions

  1. First, cook up your chicken tenders over medium heat until cooked all the way through. Then toss 'em with the hot sauce until coated pretty evenly.
  2. Next, mix up your dressing - combine the crumbled cheese, mayo, sour cream, and milk. Stir together until they're blended well.
  3. Then mix the shredded carrots with your lettuce - either slice up a head of iceberg, or use a bagged salad mix.
  4. Now pour your dressing over the salad, and top with the Buffalo Chicken and broken bagel crisps. Soooo good!
https://sunshineandsippycups.com/2012/08/creative-ideas-for-cooking-with-bagel-crisps/

These little crisps are the perfect addition to your kids lunches this school season, or a great back to school snack after school. And they’re the perfect mom-on-the-go snacker too – throw a bag in your purse, so you have something super satisfying that’s still good for you, no matter how crazy your days get. You’re too smart to grab fast food and all it’s greasiness, right? These will fill you up, without filling you out.

Bagel Snack Star Sweepstakes

Bagel Snack Star Sweepstakes

And you thought that this post couldn’t even get any better, I know. But to top it off – there’s also a super sweet giveaway for you to enter! New York Style Bagel Crisps is giving fans a chance to win a red carpet movie experience with their friends and family. So cool.

Grand Prize: One winner will have the chance to win a private VIP photographed and catered experience at their local movie theater. New York Style will rent out the theater for you to host the ultimate experience with 50 friends. The winner will also receive a gift card for a year supply ($500 worth) of movie tickets.

If you’re feeling super lucky today, make sure to enter to win all the other great prizes that I’m giving away this month – they’re all listed together in my sidebar. And make sure to follow New York Bagel Crisps on Facebook and Twitter, to stay updated on more fun new products and promotions!

{Disclaimer: I wrote this review while participating in a campaign by Mom Central Consulting on behalf of New York Style and received a product sample to facilitate my review and a promotional item to thank me for participating. Photo Credit.}

signature

4 Healthier Summer Cocktail Recipes

Healthier Summer Cocktails – Yep, it’s possible!… You know how much I love to entertain in the summer, right? We love having a house with a pool and big patio, since it’s the perfect gathering spot for all of our fave friends and family. I live in Central Washington state, and it gets HOT here. Like, upper 90’s all summer, with plenty of 100+ days. I think the hottest we’ve had so far was 110 a couple of weeks ago. That means that we spend a ton of time in the pool, and cold beverages are a must. So, since I finally lost a bunch of my baby weight on Nutrisystem, I am always creating new healthier alternatives to my favorite summer dishes and drinks. Keep reading to see my best new drink ideas that won’t pack on the calories…

healthier summer cocktails

How to Make 4 Healthier Summer Cocktails

All of these drinks are healthier for you because they use the new C&H Light: Sugar & Stevia Blend. Less sugar = skinnier drinks for summer entertaining, without losing the flavor, or getting that artificial taste. Half the calories of sugar, and only 5 calories per serving. Rockin’, right? I use it to make a simple syrup that I use to mix my drinks with. I mix 5 big ol’ teaspoons of the C&H Light with 2 cups of warm water. Shake it up, let it dissolve, then flavor it if desired. This makes a great mixer for any drink! Here are a few faves that I use it in:

  1. Pomosa: Flavor your syrup with just a bit of pureed fruit – any type will work great. Then mix it with 4 oz. sparkling wine. 1 oz. Van Gogh Pomegranate vodka. Pour the vodka into a flute, add a bit of the syrup, then top it with the sparkling wine and a strawberry if you’d like to get fancy. So good!
  2. Skinny Colada: For this drink, make a citrus syrup. Use orange, lemon or lime peel. The oils make a lovely syrup but be care not to add any pith or your syrup will just chunky. Mix 2 oz. SKYY Infusions Coconut, ¼ oz. SKYY Infusions Pineapple, 2 oz. Club soda, and a couple teaspoons of the citrus syrup. Mix over ice in a highball glass. Mmmm.
  3. Caramel Appletini: Mix 2 oz of Vodka, 1 oz. Butterscotch Schnapps, and mix in just a bit of syrup made with 1/4 cup of cocoa powder. Shake it up, and add a green apple slice for garnish. Very fun.
  4. Slender Mint Margarita: For this syrup, we’ll do a mint syrup, using 6 to 10 large fresh leaves. Then mix 3 parts Tequila, 1 part Triple Sec, 4 parts lime juice (roughly two limes per serving), 1 part mint syrup, and 12 parts diet lemon-lime soda. You can blend it with ice if desired, or just pour over ice.

For more ideas on how to make flavored syrups using C&H Light, check out my fave resource, How To Flavored Simple Syrup, on Mix n’ Sip. So many awesome ideas, and I always think of a new drink to try when I’m looking at that list! {Yes, I create a new themed drink for every party I host. I’m that type of girl…. Lol.} Making your own syrup saves you a ton of money when you don’t have to buy a bunch of mixers, and it’s way healthier for you too, since you’re avoiding lots of weird, unnatural ingredients, and getting way less sugar.

half the sugar for skinny cocktails

The light way to do sugar!

C&H® Light is an all natural pure cane sugar and stevia blend with half the calories of sugar. That’s over a 350-calorie savings in each cup! By blending pure cane C&H® Sugar with a naturally sweet extract from the stevia plant, we have created a delicious sweetener with no artificial ingredients. C&H® Light is the ideal sweetener — a perfect sweet taste and half the calories of sugar! You’ll also find it packaged as Domino Light – and it’s great for baking too. Baking is as easy as cutting it in half – if the recipe calls for 1 cup of sugar, all you need to do is use 1/2 cup of Domino® Light OR C&H® Light. Easy peasy!

Join the fun at the Twitter party on 8/8/12 – RSVP here. Or follow them on Facebook and Twitter to learn about fun new products and promotions!

{Disclaimer: I received compensation for creating this content for you – this is sponsored project from Global Influence. All recipes, ideas, and opinions are 100% my own.}

signature

Free Menu Planning Service + Free Visa Gift Card!

Who wants to win a super sweet $250 Visa Card to spice up their summer?…. And speaking of spicing things up, have you tried the awesome app from Food on the Table yet? I use it for all my meal planning – I get my grocery list matched up with the sales and specials at my local Safeway store, and great menu ideas based on what I have on hand. So cool….

Get Free Menu Planning Help & Enter to WIN big today!

As you can see, there are a TON of prizes – which means a TON of chances for some of you guys to win! And it’s such a great program, I can’t recommend it enough anyway. So having a chance to win on top of their awesome free service is just like the sprinkles on top. Check it out today – and good luck!! Whether you win a prize or not, you’ll still be super glad you signed

signature

Mix it up! Simple Summer Iced Coffee Drink Recipes

Amp up your Iced Coffee this summer… So by now, you all know that I am a full-fledged coffee junkie. Yep,it’s true. Without it, I’m just a floppy jellyfish, slithering out to the kitchen to get my first dose of caffeinated deliciousness. But with coffee, I’m able to transform from a mindless jellyfish into a total Super Mom….  “Faster than a speeding toddler, more powerful than those tough-to-reach dust bunnies, able to leap tall piles of laundry in a single bound….” Yep, coffee is what I’m all about. And, while I drink and love coffee in any form, from a basic home-brewed cup o’ joe, to a beautifully blended espresso drink at a coffee house – my favorite way to drink it is a homemade iced coffee drink. So I’m going to share a few of my favorite mixes with you ladies today!

candy bar and cookies iced coffee recipe

 “A MORNING WITHOUT COFFEE IS LIKE…. SLEEP.” – AUTHOR UNKNOWN

There are a lot of tutorials out there on how to make cold-press iced coffee at home – but they are kind of complicated, and I didn’t always get perfect results each time. Plus – how I am supposed to follow so many steps in the morning BEFORE I’ve had any coffee, right? A muuuuuch easier solution for busy moms is to pick up a carton or two {or three…} of the new Iced Coffee by International Delight. Seriously – I have never been a fan of any type of pre-made iced coffees before, but this stuff is perfection in a carton. No lie. And while I could chug buckets of it straight any day, it’s also fun to Mix It Up – and make some fun flavor combos using International Delight’s line of creamers, plus a few other simple ingredients. My VERY favorite is my Candy Bar & Cookies Iced Coffee – the recipe is coming, just wait…

tons of International Delight Iced Coffee cartons

“BEHIND EVERY SUCCESSFUL WOMAN IS A SUBSTANTIAL AMOUNT OF COFFEE.” – STEPHANIE PIRO

First step – Head to your local grocery store to pick up a carton of this awesome iced coffee from International Delight. There are three flavors to choose from, Mocha, Original, and Vanilla. I love ’em all – and any of them will work just great in these recipes. So – I use Original. If you want it a little sweeter go with Vanilla, if you want it a little more chocolaty, then grab the Mocha. You’ll find these in the dairy section of the store – they’re usually in the cases next to the milk and coffee creamers. But – I LOVED this giant bay of iced coffee at Walmart last time I shopped – so many glorious cartons of coffee…. total #IcedDelight.

candy bar flavored creamers

“COFFEE IS A BEVERAGE THAT PUTS ONE TO SLEEP WHEN NOT DRANK.” – ALPHONSE ALLAIS

Next step is to grab some creamer… As you can see, there are a TON of awesome flavors of International Delight creamers to choose from. For the Candy Bar and Cookies recipe, I used the Peppermint Patty flavor – but there are a bunch of other super yummy candy bar flavored creamers that would work great too – Like Heath Bar or Almond Joy. So grab a few – and experiment with some mix’en and match’en.

simple candy bar and cookies iced coffee recipe

“No one can understand the truth until he drinks of coffee’s frothy goodness.” – Sheik Abd-al-Kadir

By now your taste buds are shouting – “Get to it lady! Show us the goods – give us the recipe for this sweet iced coffee awesomeness already!” – am I right? So, drum roll please…. Follow these easy peasy directions to make your own totally amazing Candy Bar & Cookies Iced Coffee drink this summer too:

Candy Bar & Cookies Iced Coffee Recipe

Ingredients

  • Crushed Ice
  • International Delight Iced Coffee - Original Flavor
  • International Delight Creamer - Peppermint Patty
  • Oreo Cookie Ice Cream - One Scoop
  • Whipped Cream
  • Chocolate Sprinkles
  • Oreo Cookie for garnish

Instructions

  1. Fill a great big ol' glass with crushed ice.
  2. Pour the International Delight Iced Coffee over ice, until the glass is about 3/4 full.
  3. Add a bit of the creamer {more or less, depending on your preference} - stir it up.
  4. Scoop up a big spoonful of Oreo Cookie ice cream, and add it on top of your drink.
  5. Spray a bit of whipped cream, shake on a few chocolate sprinkles, and add an Oreo cookie as a garnish.
  6. Drink it all... Then make another!
https://sunshineandsippycups.com/2012/07/mix-it-up-simple-summer-iced-coffee-drink-recipes/

mix it up - iced coffee recipes

“Coffee is the best thing to douse the sunrise with.” – Terri Guillemets

Like I said earlier – Don’t be afraid to Mix it Up, and amp up your summer with some cool iced coffee creations. With so many awesome flavors of iced coffee and new creamers from International Delight, it’s super easy to mix up great recipes to enjoy in those rare moments you can sneak away for a little “me time” on the patio- and they’re perfect for summer entertaining. Here are a few other ideas to help inspire your own iced coffee creativity:

  • Iced Coffee Milkshakes: Crushed Ice, Iced Coffee, Creamer, and 1/3 package {small size box} of instant pudding mix, blended up. Soooo good! Use any flavor combos: I like to use Original Flavor Iced Coffee, white chocolate pudding mix, and Caramel Macchiato creamer.
  • Cinammon Roll in a Glass: Vanilla iced coffee, Southern Butter Pecan creamer, and a dash of cinnamon mixed up over ice.
  • Coffee Ice Cream Soda: This rocks – Fill glasses 3/4 full with iced coffee. Pour your choice of creamer in – just a dash. Drop a spoonful of ice cream to your glass. Pour club soda over to fill and fizz. Then top with whip cream and a cherry.

See what I mean? Once you get into it, there are SO many combos you can come up with! If you experiment with these flavors, leave me a comment letting me know what recipes YOU come up with! I’ll share some favorites on my Facebook page – so let me know in the comment if it’s ok to use your name, and leave a blog link if you have one :)

 For more great ideas be sure to follow International Delight on Facebook and Twitter too!

Collective Bias - Social FabricI am a member of the Collective Bias™ Social Fabric® Community.  This shop has been compensated as part of a social shopper insights study for Collective Bias™ and International Delight. #IcedDelight #CBias #SocialFabric. All photos, recipes, and opinions expressed here are 100% my own.

signature